
Setting up groups, teams, or departments in our platform allows for efficient organization and role-based access management. Follow this guide to create these organizational units easily.
Step 1) Log In and Navigate to User Management
Begin by logging into your Hapax account. Once logged in, locate the User Management section on the left side of your dashboard. This is where you can view, add, or manage users.

Step 2) Select User Group Type
At the top of the User Management page, choose the type of user group you want to create from the available options: Departments, Teams, Groups, or Admins. This helps structure permissions and user access effectively.
Step 3) Click the “Create New” Button
In the top right corner, select the Create New button. 
If there are no existing users in the selected user group, the Create New button will appear in the center of the page for easy access.
Step 4) Enter User Information
Fill out the required fields in the pop-up form, and verify the information to set up the organizational unit correctly.
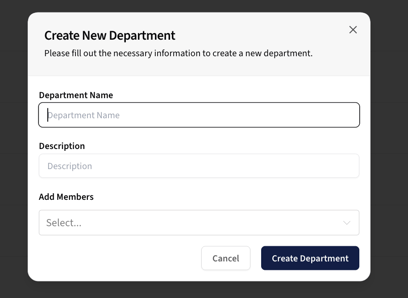
Step 5) Select “Create” to Confirm
Once all necessary information has been added, click the Create button at the bottom of the form to save and finalize the new organizational unit.

Done!
Your new group, team, or department is now created and will appear in User Management. You can now add any additional users and manage activities specific to this group. Creating groups, teams, or departments on our platform is a simple process that streamlines organization, allowing for tailored permissions and enhanced collaboration.