
Setting permissions in Hapax ensures that only the right individuals can view, edit, or take action on sensitive documents. Whether you're collaborating on policies or managing confidential files, customizing access allows you to maintain security while enabling effective teamwork. Follow these steps to set the appropriate permissions for any file within the Information Vault.
Step 1) Log In and Access the Information Vault
Start by logging into your account on the platform with your credentials. This will take you to the main dashboard. Once logged in, navigate to the Information Vault located on the left side of your dashboard. This section houses all your uploaded files and folders.
Step 2) Locate the Document
Browse or use the search bar to find the specific document for which you want to set permissions. Once found, click to open the document.

Step 3) Open Permissions Menu
In the top right corner of the edit mode screen, click on the ellipsis (three dots) icon. From the dropdown menu, select Permissions. This will open the permissions settings for the document. If you do not have the option in the drop down that means that you do not have permission to change permissions. Contact your administrator, if you need that permission access.

Step 4) Adjust Document Permissions
In the Edit Document Permissions popup, you can view the document’s default Document Permissions.

To make changes specifically for the selected document, select Custom File Permissions.

View Access: Gives the ability to view the file
Edit Access: Shares access to who you would like to edit the file.
Delete Access: Gives access to delete this file.
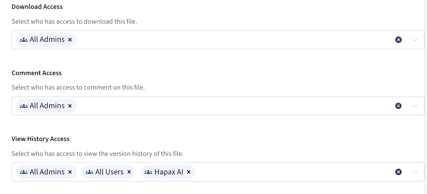
Download Access: Gives the ability to download the file
Comment Access: Gives the ability to comment and see comments on the file.
View History Access: Allows the user to view version history of the file.

Move Document Access: Gives the access to move the file
Change Permissions Access: Allows the user to change permissions for this file.
Once you complete the required fields, ensure the information is accurate to maintain proper document security.
Step 5) Save Permissions
Once you’ve set the desired permissions, select Save Permissions to finalize your choices.
You’ve successfully updated the permissions for your document. The right people now have the right level of access—keeping your information secure and your team aligned. If you ever need to make changes, you can revisit the Permissions menu anytime.